My youngest son loves squishing things between his fingers — bananas, yogurt, mud, you name it. So when I first handed him a paintbrush, I already knew the walls, his hair, and probably my shirt were in danger.
If you’ve been avoiding art time because the cleanup feels worse than the fun, I get it. But toddlers don’t need a fully stocked art studio to explore creativity. Some of the best sensory and fine motor experiences happen with projects that barely leave a trace.
These 8 mess-free (or mess-contained) art projects use everyday household items and take minutes to set up. I’ve arranged them from virtually zero mess to “you might want a damp cloth nearby” — so you can pick your comfort level.
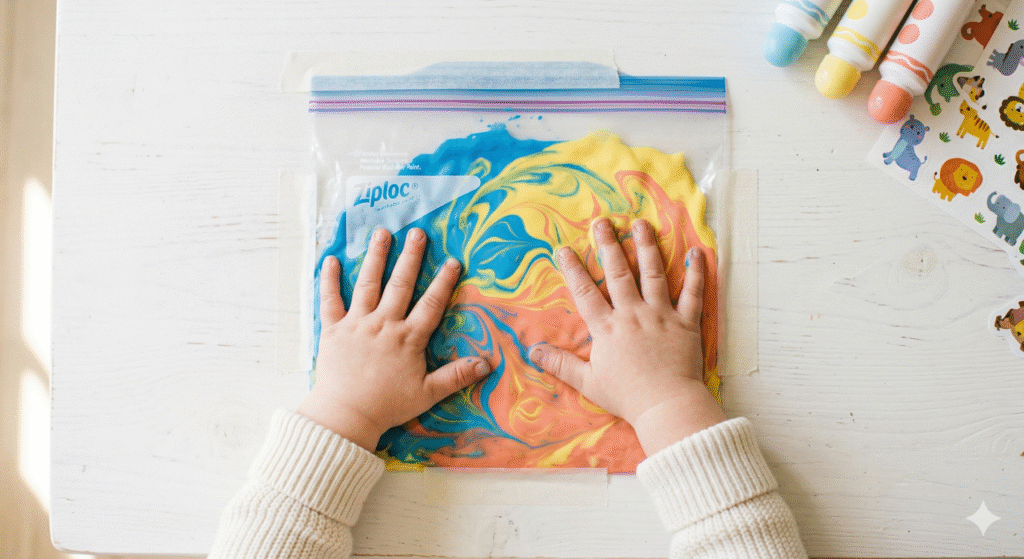
1. Zip-Top Bag Painting
What You Need
A gallon-size zip-top bag, 2–3 colors of washable paint, and strong tape (packing tape or duct tape).
How to Do It
Squeeze a few blobs of paint inside the bag, press out the air, and seal it shut. Then tape the seal closed — this is the important part, because curious little fingers will try to open it. Tape the bag flat onto a table or highchair tray, and let your toddler squish, swirl, and drag their fingers across the surface.
The colors blend and shift under their hands, which is mesmerizing for young toddlers still learning cause and effect. My youngest son spent a solid 15 minutes on this the first time — which in toddler attention spans is basically a lifetime.
Sensory exploration Cause & effect Color mixing Fine motor
2. Sticker Art
All you need: large stickers (at least 1 inch / 2.5 cm) and a piece of paper or cardstock. Dot stickers, animal stickers, foam stickers — whatever you’ve got.
Peel the stickers halfway off the backing sheet so your toddler can grab them more easily, then let them stick away. Simplest project on this list — and one of the most effective for building fine motor skills.
Peeling and placing stickers requires the pincer grasp (thumb and forefinger working together), which is the same movement children need for holding a pencil later. Don’t worry about where the stickers end up. On the paper, on the table, on their own belly — it all counts.
Pincer grasp Hand-eye coordination Decision making
3. Water Painting on the Sidewalk
Grab a wide paintbrush or foam brush and a cup of water — a muffin tin works great as a “paint palette” since it’s sturdy and hard to knock over. Head outside to a concrete sidewalk, patio, or driveway. Dip the brush in water and paint. Dark streaks appear on the dry surface, then slowly fade as the water evaporates — which is weirdly entertaining for them.
This one is my go-to for hot afternoons. It teaches the basic motion of painting (dip, stroke, dip again) without any staining risk. Your toddler can also “paint” fences, flower pots, or outdoor furniture. Everything dries and resets like a magic canvas.
Gross motor (arm movement) Grip strength Cause & effect Outdoor sensory
4. Contact Paper Collage
What You Need
Clear contact paper (sticky shelf liner), tape, and collage materials — torn tissue paper, leaves, flower petals, yarn scraps, or fabric pieces.
How to Do It
Cut a piece of contact paper and tape it sticky-side-up onto a table, window, or wall at your toddler’s height. Put the collage materials in a bowl or tray next to it. Your child picks up pieces and presses them onto the sticky surface — no glue required.
Toddlers will peel and re-stick the same piece ten times — they don’t get tired of it. And because the contact paper does the “gluing,” there’s no wet paste on hands, clothes, or furniture. When they’re done, you can press another sheet of contact paper on top to seal it and hang it in a window as a suncatcher.
Pincer grasp Sensory (textures) Creative choice Hand-eye coordination
5. Edible Finger Paint
What You Need
Plain yogurt (or mashed banana) and a few drops of food coloring. A highchair tray or large baking sheet as the painting surface.
How to Do It
Mix a small amount of food coloring into separate spoonfuls of yogurt to create 2–3 colors. Dollop the colors onto the tray surface, and let your toddler explore with their hands.
This is the best option for the youngest artists — the ones who still put everything in their mouths. Since the “paint” is actual food, a taste here and there is perfectly fine. My youngest son’s first art experience was smearing blueberry yogurt across his highchair tray right around his first birthday. Did it look like art? No. Did he love it? Absolutely.
Sensory (touch + taste) Cause & effect Color recognition Early mark-making
6. Dot Markers
Pick up a set of washable dot markers (also called Do-a-Dot markers) and some cardstock — it holds up better than thin printer paper. Hand your toddler a marker and let them stamp. They press the round sponge tip down to leave a colorful circle. That’s the whole activity — and it’s one toddlers will happily repeat dozens of times.
Dot markers are one of those supplies that earn their shelf space fast. They’re easier to grip than crayons, they don’t roll off the table, and the chunky barrel prevents the “death grip” that makes regular markers explode under pressure. The stamping motion also builds shoulder stability and wrist control. You can draw simple shapes or letters on the paper first and let your toddler fill them in with dots.
Grip & pressure control Shoulder stability Color recognition Early pre-writing
7. Tape Resist Art
What You Need
Painter’s tape (the kind that peels off without leaving residue), thick paper or cardstock, and washable paint with a wide brush or sponge.
How to Do It
Stick strips of painter’s tape across the paper in any pattern — lines, a letter, a star shape, or just random zig-zags. Let your toddler paint over the entire surface, tape and all. Once the paint dries, peel off the tape together to reveal the clean white lines underneath.
The “reveal” moment is the magic here. The look on their face when the tape comes off is worth the whole setup. And these actually turn out looking good — like, hang-it-on-the-wall good. The mess stays moderate because the paint goes on paper, not on fingers (though fingers will inevitably get involved).
Whole-arm painting Patience & anticipation Fine motor (peeling) Spatial awareness
8. Mess-Contained Tray Painting
What You Need
A large baking sheet or storage container lid as a tray, washable paint, thick paper that fits inside the tray, and painting tools — sponges, cotton balls, a fork, or toy cars.
How to Do It
Place the paper inside the tray. Add a few dollops of paint. Then let your toddler use the tools (or their hands) to spread, stamp, roll, and drag paint around — all contained within the edges of the tray.
The tray is the key: it creates a physical boundary that catches drips, limits spread, and gives the whole experience a “workspace” feel. This is real, actual painting — just with guardrails. You can roll toy cars through the paint to make tire tracks, press forks in to make line patterns, or bounce cotton balls for a splatter effect. My youngest son is obsessed with the toy car method — he gets to play cars and make art at the same time.
Free creative expression Sensory (multiple textures) Tool use Cause & effect
Tips for Making Toddler Art Time Easier
Embrace the blob. Your toddler’s painting will look like a smudge. That smudge is a masterpiece. The goal isn’t a pretty result — it’s the sensory experience of squishing, pressing, and smearing.
Prep everything before you start. Once a toddler sees paint or stickers, you have about 10 seconds before they’re grabbing. Have materials ready to go, surface protected, and sleeves rolled up before you open anything.
Offer only 2–3 colors at a time. Too many options overwhelm toddlers and everything ends up brown. Start with two contrasting colors (blue and yellow, red and white) and let them discover what happens when they mix.
Follow their lead. If they want to peel stickers off after placing them, that’s fine — it’s still a fine motor workout. If they want to paint their own hand instead of the paper, that’s sensory exploration. The process matters more than the product at this age.
Keep sessions short. Five to fifteen minutes is plenty for most toddlers. If they’re done after three minutes, that’s okay too. Forcing a longer session usually just leads to more mess and less fun.
Keep a wet washcloth nearby. Not for the art — for the moment your toddler decides they’re done and tries to touch the couch, the wall, or your face. A damp cloth within arm’s reach saves you every time.
Don’t overthink supplies. Most of what you need is already in your kitchen — zip-top bags, tape, baking sheets, yogurt. For dot markers and contact paper, check Target, Walmart, or your local dollar store.
Why Mess-Free Art Still “Counts”
There’s a common worry that containing the mess somehow limits the creative experience. But for toddlers aged 1–3, the developmental value of art comes from the sensory input and motor practice — not from how freely the paint flies. Squishing a bag of paint builds the same hand muscles as finger painting on paper. Placing stickers practices the same pincer grasp as gluing sequins.
Mess-free projects can actually extend art time, because you’re not hovering anxiously or cutting things short before the paint reaches the couch. And honestly, when you’re not panicking about the carpet, everyone has more fun.
Start with the projects that feel comfortable and work your way up. There’s no rule that says toddler art has to involve scrubbing walls afterward.
Want more toddler activity ideas with zero stress?
Download our free Screen-Free Activity Cards — 30 play ideas sorted by mess level, with age recommendations for every activity.