Some afternoons, all three of my kids seem to hit their limit at the exact same time. My youngest son is whining, my older son is bouncing off the walls, and I’m standing in the kitchen wondering how it’s only 3 PM.
On those days, I used to reach for the iPad. I’m not proud of it, but survival mode is real. Then I discovered that five minutes of dumping rice into a plastic bin could buy me the same amount of quiet — without the screen-time guilt. That was the beginning of our sensory bin obsession.
Sensory bins for toddlers are simply containers filled with materials that invite kids to touch, scoop, pour, and explore. They’re one of the easiest ways to support your toddler’s development through play — building fine motor skills, encouraging focus, and helping little ones learn to calm themselves down.
But here’s the thing: most sensory bin guides online require craft-store trips, food coloring projects, and an hour of prep. That’s not realistic when you’ve got a toddler pulling at your leg.
So I put together 15 sensory bins for toddlers that actually take under 5 minutes to set up, organized by season so you always have fresh ideas. Every single one uses materials you probably already have at home.
Want all 15 sensory bins on printable cards?
Grab the free Sensory Bin Quick-Start Cards — each card has materials, setup steps, age range, and mess level. Print them and stick on your fridge.
Before You Start: The 5-Item Sensory Bin Starter Kit
You don’t need anything fancy. Here’s everything you need to get started:
- A container — a shallow plastic storage bin, baking dish, or even a large mixing bowl. Under-bed storage boxes work great because of the high sides.
- A base filler — dry rice, dried beans, dried pasta, or oats. That’s it. Check your pantry.
- 2–3 scooping tools — measuring cups, spoons, a funnel, tongs, or a small ladle.
- A few small toys or objects — plastic animals, cars, letters, or whatever your child loves. These turn a basic bin into a world.
- A mess catcher — a large towel, flat bedsheet, or plastic tablecloth underneath. This is the secret to staying sane.
That’s your starter kit. Everything else is a bonus.
Sensory Bins for Toddlers by Age: What’s Safe and What Works
Not every bin works for every age. Here’s a quick guide to help you pick the right ones for your child:
Taste-safe fillers only (cooked pasta, oats, large fabric pieces). Everything goes in the mouth. Stay within arm’s reach.
Dry rice, large beans (like lima or kidney), water. Still mouthing age — avoid small hard objects. Sit with them and model scooping/pouring.
Themed bins with sorting tasks. Can follow simple rules like “keep it in the bin.” Add plastic animals, letters, shapes.
More complex themes, science-style exploration (ice melting, color mixing). Can use smaller tools like tweezers and tongs, smaller fillers like lentils.
Spring Sensory Bins (4 Ideas)
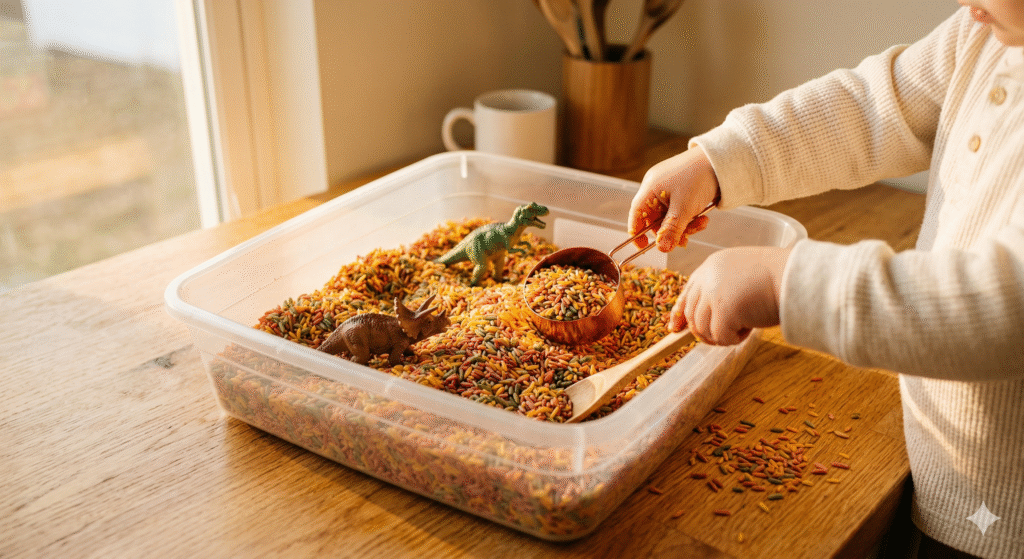
1. Rainbow Rice Garden
Pour 2–3 cups of dry rice into your bin. Tuck in a few silk flowers or fresh leaves from outside, add a small cup, a spoon, and a toy watering can if you have one. Done.
My daughter used to spend ages carefully “watering” her rice flowers and arranging them in little rows. She was about two at the time, and this was the first sensory bin that gave me a solid 20 minutes of calm, focused play. I remember thinking, wait, is this allowed? Am I just… sitting here?
If you want colored rice, you can shake rice in a bag with a few drops of food coloring and a splash of vinegar, then let it air-dry on a baking sheet. But honestly? Plain rice works just fine.
2. Bug Hunt Bin
My older son went through a phase where he was obsessed with “catching bugs” in the backyard — but it was February and there were no bugs. So I made him some.
Fill the bin with dried pasta (any shape). Bury 8–10 plastic insects — ladybugs, butterflies, ants, spiders. Give your child a pair of kid-friendly tongs or large tweezers and a muffin tin for sorting.
He would line up his catches and announce facts he made up about each one. “This ladybug eats clouds, Mom.” It’s one of those bins that naturally leads to outdoor exploration afterward — once it’s warm enough, take the bug hunt outside for real.
3. Flower Soup
Fill the bin halfway with water. Add a few handfuls of flower petals (from your yard or grocery store flowers that are past their prime), some soft leaves, and a few fresh herb leaves — basil or mint work well — if you have any. Add cups, spoons, and a small ladle.
This is a gorgeous bin that smells amazing. My youngest son loves stirring his “soup” and pouring it back and forth between cups. The natural scents add a sensory layer that most bins miss — and it’s free if you grab petals from your own yard.
4. Seed Scoop & Plant
Fill the bin with dry oats (a soft, taste-safe base that looks surprisingly like soil). Add large seeds like pumpkin seeds or dried lima beans, small cups, and a toy shovel. Kids scoop “soil” into cups and “plant” the seeds.
For kids 3 and up who are past the mouthing stage, you can swap the oats for actual potting soil — messier, but they love the realness of it. And if you want to extend this into a real activity, let your child plant one seed in a small pot with real soil and water it. Watching it sprout over the next week connects the play to something real.
Summer Sensory Bins (4 Ideas)
5. Ocean Discovery Bin
Fill the bin with water and add a drop of blue food coloring (optional). Drop in plastic sea animals — fish, dolphins, starfish, octopus. Add shells if you have them, plus cups and a small net or slotted spoon.
We set this one up on our patio in summer and both boys would play with it for close to an hour. Fishing out the animals with a net is surprisingly absorbing — even our older son, who usually moves from activity to activity every ten minutes, stayed locked in.
6. Ice Rescue Bin
“The dinosaur is trapped! We have to save him!” My older son said this with such urgency that I almost believed there was an actual emergency.
The night before, freeze small plastic animals or toys inside ice cube trays, muffin tins, or small containers filled with water. At playtime, pop the frozen blocks into a bin and give your child warm water in a squeeze bottle, a spoon, and a small cup.
He worked on those ice blocks for 40 minutes straight. No fights, no whining, no asking for a snack. This is the bin I recommend to every parent who says “my kid won’t sit still for anything.” Try this one. Trust me.
7. Sand & Dig Construction Site
Fill the bin with kinetic sand or regular play sand. Add small construction trucks, toy dump trucks, rocks, and a few sticks. That’s it — seriously, that’s it.
Something about loading, dumping, and building roads in sand is endlessly satisfying for kids. This one requires almost no creativity from you on a tired afternoon, which is honestly half the appeal.
8. Lemonade Stand
Fill the bin with water. Add sliced lemons (or plastic lemon toys), measuring cups, a funnel, small cups, and a spoon for stirring. Your child is the lemonade maker.
My daughter used to make “lemonade” for everyone in the family and serve it very seriously in tiny cups. She’d tell us the price (“three dollars, please”) and get offended if we didn’t pretend to pay. The dramatic play angle kept her going way longer than a basic water bin ever would.
Fall Sensory Bins (4 Ideas)
9. Pumpkin Patch Scoop
Fill the bin with dried corn kernels (they’re cheap and usually easy to find at grocery stores in fall). Add small foam or plastic pumpkins, gourds, and scooping tools.
The sound of corn kernels being scooped and poured is oddly satisfying — for adults too, honestly. My older son could sit and just pour them from cup to cup, over and over. Add a muffin tin for sorting pumpkins by size, and you’ve snuck in a math concept without anyone noticing.
10. Harvest Farm Bin
Fill the bin with dried black beans or lentils (they look like rich soil). Add plastic farm animals — cows, chickens, pigs, horses — and a few toy fences or small blocks to build a pen. Include a scoop and a small truck for hauling.
My older son would build elaborate farm layouts and narrate stories about each animal for longer than I thought possible. The trick with this bin is the dark beans — they just look like real dirt, and kids buy into the pretend world instantly.
11. Nature Walk Sensory Bin
Take a quick walk with your child and collect fallen leaves, pinecones, small sticks, and interesting rocks. Dump everything into the bin along with a few sorting cups. Done.
This one is free and requires zero shopping. Let them sort by texture, size, or type — or just let them crinkle leaves and bang rocks together. My daughter liked arranging everything into “families.” The pinecone was always the dad, for some reason.
12. Apple Orchard Bin
Fill the bin with dry oats (a soft, taste-safe base). Add red, green, and yellow large pompoms — at least 1 inch across — as “apples.” Include tongs, a small basket, and cups labeled with colors for sorting.
Fair warning: the first time I set this up, my older son just dumped all the pompoms on the floor and walked away. I almost gave up on it. But the next week I tried again, sat with him, and showed him how to pick up the “apples” with tongs. Something clicked — he sorted every single one by color and then looked at me like he’d just won a gold medal. Sometimes bins need a second chance.
Winter Sensory Bins (3 Ideas)
13. Fake Snow Bin
Mix equal parts baking soda and cornstarch in the bin. Slowly add water until it reaches a soft, moldable consistency. Add small winter animal figures — penguins, polar bears — and scooping tools.
This “snow” feels cool and powdery, and kids love molding it into little hills and burying animals in it. My sons made a whole arctic scene and spent the afternoon “rescuing” animals from snowstorms. It is messier than dry bins — I’ll be honest, we found baking soda dust in places I didn’t know existed — but the texture is worth it. Lay that tablecloth down.
14. Arctic Animals Exploration
White rice or shredded white paper for “snow.” Plastic arctic animals. That’s literally it.
Sometimes the simplest bins are the best ones. This works especially well for younger toddlers because you can use larger animals with no small parts. My youngest son’s favorite move was dropping each animal into the rice with a satisfying thud, then digging it back out, then dropping it again. And again. And again.
15. Hot Cocoa Sensory Bin
Fill the bin with dry brown rice or brown lentils (for kids 3+) as the “cocoa.” Add cotton balls as marshmallows, small cups, a spoon, and a tiny funnel.
This was our cozy afternoon bin during winter. My daughter would carefully scoop “cocoa” into cups, add exactly three “marshmallows” (always three, never two, never four), and serve it to her stuffed animals with great ceremony. It’s the kind of quiet, focused pretend play that makes you want to freeze time.
Calming Bins vs. Stimulating Bins: Which Does Your Child Need?
When it comes to sensory bins for toddlers, not all bins serve the same purpose, and picking the right type for the moment makes a big difference.
Calming bins work best when your child is overstimulated, wound up, or transitioning between activities. Use soft, quiet fillers: dry rice, kinetic sand, water with gentle pouring tools, or the fake snow recipe above. The repetitive motion of scooping and pouring helps kids regulate their nervous system and slow down. You’ll notice it in their breathing — it actually gets slower.
Stimulating bins are better for rainy days when your child needs something engaging, or when you want to channel big energy into focus. Use bins with hidden objects to find (Bug Hunt), problem-solving elements (Ice Rescue), or dramatic play scenarios (Lemonade Stand, Hot Cocoa). These keep restless kids absorbed and challenged.
When in doubt, start with a calming bin. You can always add complexity if they lose interest.
How to Keep Sensory Bins from Destroying Your House
Let’s be honest — the number one reason parents avoid sensory bins for toddlers is the mess. I get it. Here’s what actually works, from someone who’s cleaned rice out of couch cushions more than once.
The blanket trick: Lay a large flat sheet or plastic tablecloth under the bin. When playtime is over, fold the edges toward the center and pour everything back in. This one habit alone eliminates 90% of cleanup stress. I use a cheap dollar-store tablecloth and it’s been a game-changer.
Set the one rule early: “The filler stays in the bin.” Say it before every session. The first few times your child throws rice on the floor, calmly end the session. They learn fast when throwing means the fun stops. My older son tested this rule exactly twice before he figured it out. My youngest… took a bit longer. But he got there.
If you’re nervous about mess, start with dry rice or oats — they vacuum up in seconds. Save water and sand bins for outside or the bathtub until you’re comfortable. And use a high-sided container. Under-bed storage boxes are perfect because the tall walls keep most of the chaos contained.
One more thing: most dry bins can be reused for weeks. We keep three labeled bins in our closet and rotate them. The rice bin has been going strong for months.